
Daylilies are some of the easiest, most prolific flowers to grow.
They’re also a great flower for first-time gardeners, as they’re easy to maintain and grow well in almost any environment.
Daylilies are in the genus Hemerocallis and are native to Asia. The name “Hemerocallis” literally means “day”and “beautiful,” as the flowers only open during the day and close at night.
Daylily blooms usually last about 2-5 weeks, depending on the variety.
They typically bloom from May to June, though there are some that can bloom as early as March or bloom until September.
Daylilies are perennial flowers, meaning they grow back every year from their roots, not from seed.
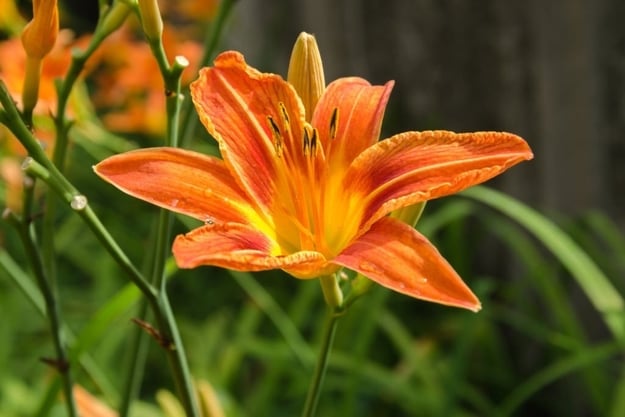
Most varieties of daylilies have bright yellow flowers on tall stems, with varying degrees of petals and sepals. A few varieties have white or pink blossoms.
In addition to their bright petals, daylily petals have a frilly outer edge that makes them unique among other plants that share their height and flower color.
Daylilies are grown for their flowers, which appear in clusters at the end of the plant’s long stems.
Daylilies bloom best when they’re planted in places where they’ll get full sun preferably even light throughout the day as well as moisture
What are daylily proliferations?
You may have noticed a new shoot growing on a daylily scape (the stalk that holds the flower bud) and wondered what you should do with it.
Well, we’re here to answer that question for you! You see, this new shoot is called a proliferation, either way, it’s definitely a sign that you could be seeing some new daylilies in your garden next year!
You can do one of two things to help this new shoot: either leave it alone, or root it and transplant it into the garden.
If you leave it alone, it will usually dry up naturally by the end of the season. But if you’d like to make sure you have a healthy new daylily come springtime, you can cut them off to root and transplant it.
Removing the daylily proliferations
You should begin by cutting the daylily scape (the part of the plant that’s visible above ground) immediately above the base of the proliferation and about two inches below it.
If you’re not sure what a scape looks like, look for a part of the plant that looks like a fat stem with flowers at the top (although you won’t be able to see any buds or flowers on a scape).
Prepare the proliferations for planting
First and foremost, keep your proliferations in a cup filled with water. It’s important to keep the roots moist so they can continue to grow as much as possible before planting.
You can add a little bit of fertilizer to the water if you’d like, but otherwise just make sure to change the water regularly.
Next, make sure your proliferations are near a window. The sun is an essential component of photosynthesis.
Finally, once your proliferations are big enough that their roots are visible through the bottom of the cup (about two weeks), it’s time to plant them outside so they can begin producing flowers!
Determining where to plant the daylily proliferations
Place the daylily somewhere in full or partial sunlight.
In general, most daylilies prefer sunnier environments.
If you’re going for that classic look of a lush green lawn with a pop of purple along the border, it’s best to plant the daylily in an area that gets plenty of sun.
However, if you’d like something more subtle and are looking for a more natural-looking display of color, choose an area that has mostly shade during peak sunlight hours but is still receiving some sunlight like under trees or near buildings.
Prepare the hole where you want to plant the daylily proliferations
Make sure you have all your supplies. You’ll need a shovel, a trowel, and some compost.
- Dig a hole in your garden about 5 inches deep, then 4 inches wide. Make sure to remove any rocks or roots from the soil before you put down your compost you don’t want that messing with your roots!
- Add your compost into the bottom of the hole, then use your trowel to shape it into a cone shape about 3 inches deep with a wide base.
- Now comes the fun part: plant those babies! Dig out pockets in the compost just like you would if you were planting regular seedlings. Plant one daylily at the top of each pocket and lightly cover them up with dirt and compost.
That’s it! You’re done! Just keep watering regularly and watch your daylilies grow and grow throughout the summer
FAQ:
Where do Daylilies grow best?
In order to get the best possible results growing these beautiful flowers in your garden, you should know that Daylilies need a pH level between 6 and 6.5, and prefer a sandy loam soil that is slightly acidic.
The plants also prefer partial sun or full sun, meaning that it should be shaded from direct afternoon sunlight for about half the day to retain the color of flower.
Do daylilies do well in pots?
Yes daylilies do grow well in pots.
The great thing about daylilies is that they are very easy to care for, even when you’re dealing with limited space.
You can either plant them directly into your garden, or you can put them in containers if you’re dealing with small yards or apartment balconies, patios, and other small spaces.
A great thing about planting them in pots is that they will bloom longer than if you planted them directly into the ground because their roots aren’t competing with other plants.
While the plant won’t grow much larger than what it already is in height, it will definitely bloom longer when planted in a pot.
Daylilies like lots of sun and water daily during the warmer months of the year, from April to October.
If your area has colder winters, you should keep your daylily inside and give it water.
Will daylilies bloom first year?
The short answer is yes, daylilies can bloom the first year after planting.
The long answer is a little more complex, but worth understanding for those who want to know more about this popular flowering plant.
The most important thing to remember about growing a daylily is that it takes time to establish a healthy root system.
In fact, if you grow from seed, expect to wait at least three years before your plants will bloom.
The reason for this is that daylilies need a substantial amount of time and energy to store up the nutrients they’ll need to produce flowers and seeds the following year.
To get the most out of your daylily plants in the first year, focus on getting them through their first winter with ease.
Daylilies are hardy once they’re established, but during their first season they can be susceptible to frost damage and other setbacks.
To help them along, choose plants that have been grown in USDA Hardiness Zones 3 or higher (which includes most of the U.S.) and keep them in full sun all day long.
This will give them plenty of opportunity to absorb sunlight and strengthen their roots so they can survive whatever Mother Nature has planned for them that season.
What kind of soil do daylilies like?
They love well-draining soil that has a pH value of 6 to 6.5.
They don’t want to be standing in water all the time so it’s important that the soil isn’t saturated or soggy for too long.
When should daylilies be planted?
Daylilies are planted in the spring and summer months, as early as March and April through the end of June.
The ideal time to plant daylilies is usually when the average daytime temperature is between 60 and 70 degrees F, with nighttime temperatures staying above 50 degrees F.
At this time of year, soil temperatures are warm enough for the roots to develop and allow the plants to grow quickly.
Also Read: What is eating my Salvias & How Keep Them Away From Your Plants